Unlock Creamy Sweetness: Why Master Homemade Vegan Coconut Condensed Milk?
In a world increasingly embracing plant-based living, the demand for dairy-free alternatives has soared. Among the most sought-after is a vegan version of condensed milk – a versatile ingredient cherished for its rich sweetness and creamy texture. If you've ever wondered how to make homemade coconut condensed milk that's not only delicious but also incredibly simple, you're in the right place. This two-ingredient wonder offers a fantastic solution for those seeking lactose-free, plant-based options without compromising on taste or quality. Making your own coconut condensed milk isn't just about dietary needs; it's a culinary hack that brings numerous benefits to your kitchen. You gain complete control over ingredients, avoiding unwanted additives, preservatives, or artificial flavors often found in store-bought versions. It's often more cost-effective in the long run, especially if you use condensed milk regularly. Plus, the satisfaction of creating such a foundational ingredient from scratch is unparalleled. This rich, sweet reduction of coconut milk and your chosen sweetener will quickly become a pantry staple for a myriad of desserts, beverages, and confections.The Dynamic Duo: Essential Ingredients for Perfect Coconut Condensed Milk
The magic of homemade coconut condensed milk lies in its stunning simplicity – just two core ingredients. However, choosing the right ones is crucial for achieving that desired creamy, sweet, and thick consistency.Choosing Your Coconut Milk Wisely
The foundation of your condensed milk is, naturally, coconut milk. For the best results, you absolutely must opt for **full-fat canned coconut milk**.- Why Full-Fat? The high fat content in full-fat coconut milk is essential for achieving the creamy texture and richness that defines condensed milk. Low-fat or "light" versions simply won't reduce and thicken adequately, leading to a watery, less satisfying product.
- Canned vs. Carton: Always reach for canned coconut milk. Carton coconut milk (often found in the refrigerated section) is typically diluted and designed for drinking, not for cooking or reducing.
- Ingredient Purity: When selecting your canned coconut milk, scrutinize the ingredient list. Look for brands that list only coconut extract (or coconut meat) and water. Some brands may include a small amount of guar gum as a natural stabilizer, which is generally acceptable. However, avoid those with a long list of additives, thickeners, or emulsifiers like carrageenan, as these can affect the final texture and purity of your homemade product. The cleaner, the better!
- Homemade Option: While most will use store-bought canned coconut milk, for the truly adventurous, you can even make your own full-fat coconut milk by blending fresh coconut flesh with water and straining it. However, for convenience, a good quality canned option is perfectly suitable.
Sweetening Your Way: Organic Cane Sugar vs. Maple Syrup (and Beyond)
The second vital ingredient is your sweetener, which not only provides sweetness but also contributes to the thickening process as the mixture reduces.- Organic Cane Sugar: This is a popular choice for its clean, neutral sweetness that allows the coconut flavor to shine. Organic cane sugar is made from organic sugar cane juice that has been evaporated and crystallized, making it less processed than standard white sugar. It retains some of the cane's natural molasses and minerals, giving it a slightly richer flavor. It's also naturally gluten-free. Crucially, opting for *organic* cane sugar is vital to avoid pesticides often used in conventional sugarcane farming, which can be harmful to both human health and the environment.
- Maple Syrup: For a natural, liquid sweetener option, maple syrup works wonderfully. It imparts a distinct, warm caramel-like flavor that complements coconut beautifully. Be aware that using maple syrup might result in a slightly darker-colored condensed milk and a different flavor profile compared to cane sugar, but it's delicious in its own right.
- Other Sweeteners: While organic cane sugar and maple syrup are highly recommended, you could experiment with other natural sweeteners like agave nectar or date syrup. However, be mindful that these will significantly alter the color and flavor of your condensed milk, so they're best used when those flavor profiles align with your intended recipe. Avoid highly refined white sugar if you're aiming for a less processed, more natural product.
Your Step-by-Step Guide: How to Make Homemade Coconut Condensed Milk
Making this luscious dairy-free condensed milk is surprisingly straightforward. With minimal hands-on time, you’ll have a batch ready in under an hour.- Combine Ingredients: Pour one can (about 13.5 oz or 400ml) of full-fat coconut milk into a medium saucepan. Add ½ cup of organic cane sugar (or maple syrup).
- Dissolve and Heat: Place the saucepan over medium heat. Stir continuously for a few minutes until the sugar completely dissolves into the coconut milk.
- Bring to a Gentle Boil: Increase the heat slightly to bring the mixture to a gentle boil. As soon as it starts bubbling, reduce the heat to medium-low or low, just enough to maintain a steady simmer.
- Simmer and Reduce: This is where the magic happens. Allow the mixture to simmer uncovered for about 30-45 minutes. It's crucial to stir frequently, every 5-10 minutes, to prevent the milk from scorching on the bottom of the pan and to ensure even reduction. As it simmers, you'll notice the liquid evaporating, the mixture beginning to thicken, and its color deepening to a lovely pale caramel hue.
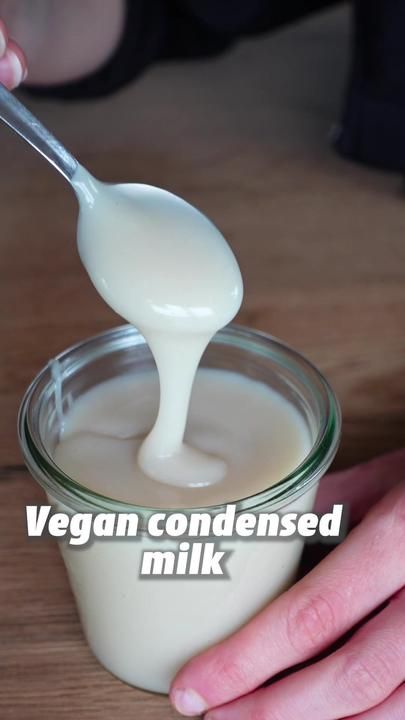
- Check for Consistency: The condensed milk is ready when it has reduced by approximately half its original volume and coats the back of a spoon. Remember, it will still be quite liquid when hot, but it will thicken considerably as it cools. If it seems too thin after 30-40 minutes, continue simmering for another 5-10 minutes, checking frequently.
- Cool and Store: Once you're happy with the consistency (even if it's slightly thinner than you expect, trust that it will thicken), remove the pan from the heat. Allow the coconut condensed milk to cool completely at room temperature. As it cools, it will transform into that familiar thick, creamy consistency. Once cooled, transfer it to an airtight container or jar.
Yield: Approximately 1 cup (240ml) of homemade coconut condensed milk.
Prep time: 2 minutes
Cook time: 30-45 minutes
Store your homemade coconut condensed milk in the refrigerator for up to 1-2 weeks. Its delightful flavor may even improve slightly over time!
Beyond the Basics: Creative Uses for Your Homemade Coconut Condensed Milk
Now that you've mastered how to make homemade coconut condensed milk, the culinary possibilities are endless! This versatile ingredient can replace traditional condensed milk in almost any recipe, bringing a delicious tropical twist.- Divine Desserts: Elevate your sweet treats! Use it as a base for vegan pumpkin pie, key lime pie, creamy custards, puddings, or no-bake bars. It’s also fantastic for creating rich, dairy-free cheesecakes and other baked goods. For a simple delight, drizzle it over fresh fruit or pancakes.
- Brews and Beverages: Stir a spoonful into your hot or iced coffee for a creamy, sweet latte – perfect for recreating Vietnamese iced coffee or Thai iced tea at home. It also adds a wonderful richness to smoothies and milkshakes.
- Irresistible Confections: This is where your homemade condensed milk truly shines for edible gifts! Think luscious vegan caramels, decadent fudge, truffles, or no-bake energy balls (like the popular coconut bliss balls). Its creamy texture makes it ideal for holding these treats together and imparting a delightful sweetness. If you're looking for more specific dessert ideas or ways to integrate this delicious creation, explore our Dairy-Free Sweetness: DIY Coconut Condensed Milk Uses.
- Homemade Ice Cream: It serves as an excellent base for crafting smooth, scoopable dairy-free ice cream, eliminating the need for an ice cream maker in many no-churn recipes.
For those eager to dive right into the making, you can find a streamlined recipe in our Easy Homemade Vegan Coconut Condensed Milk Recipe.
Troubleshooting & Tips for Success
Even with a simple recipe, a few tips can ensure your coconut condensed milk turns out perfect every time.- Patience is Key: Don't rush the simmering process. Allowing the mixture to reduce slowly and steadily is essential for achieving the right thickness and flavor concentration.
- Stir, Stir, Stir: Frequent stirring prevents the bottom from scorching, which can impart an unpleasant burnt flavor. It also helps the mixture reduce evenly.
- It Will Thicken As It Cools: This is perhaps the most important tip. When hot, your condensed milk will still appear quite liquid. Resist the urge to keep cooking it until it's super thick in the pan, as it will become almost solid once chilled. Trust the process; if it coats a spoon, it's likely ready.
- Too Thin? If, after cooling, your condensed milk is still too runny, you can gently reheat it over low heat and simmer for another 5-10 minutes, stirring constantly.
- Too Thick? If it becomes too thick or solid after chilling, you can thin it out by warming it slightly and stirring in a tablespoon or two of plain coconut milk or water until it reaches your desired consistency.
- Foaming: It’s normal for the mixture to foam as it boils and simmers. Don't worry about it; it will subside as the water evaporates and the mixture reduces.
Mastering homemade vegan coconut condensed milk is a rewarding endeavor that opens up a world of dairy-free dessert possibilities. It’s a testament to how simple ingredients, combined with a little patience, can yield something truly extraordinary. Whether you're making it for dietary reasons, culinary exploration, or simply for the joy of creating, this creamy, sweet, and versatile ingredient is sure to become a beloved staple in your kitchen. So grab your can of coconut milk and get simmering – your taste buds will thank you!
